
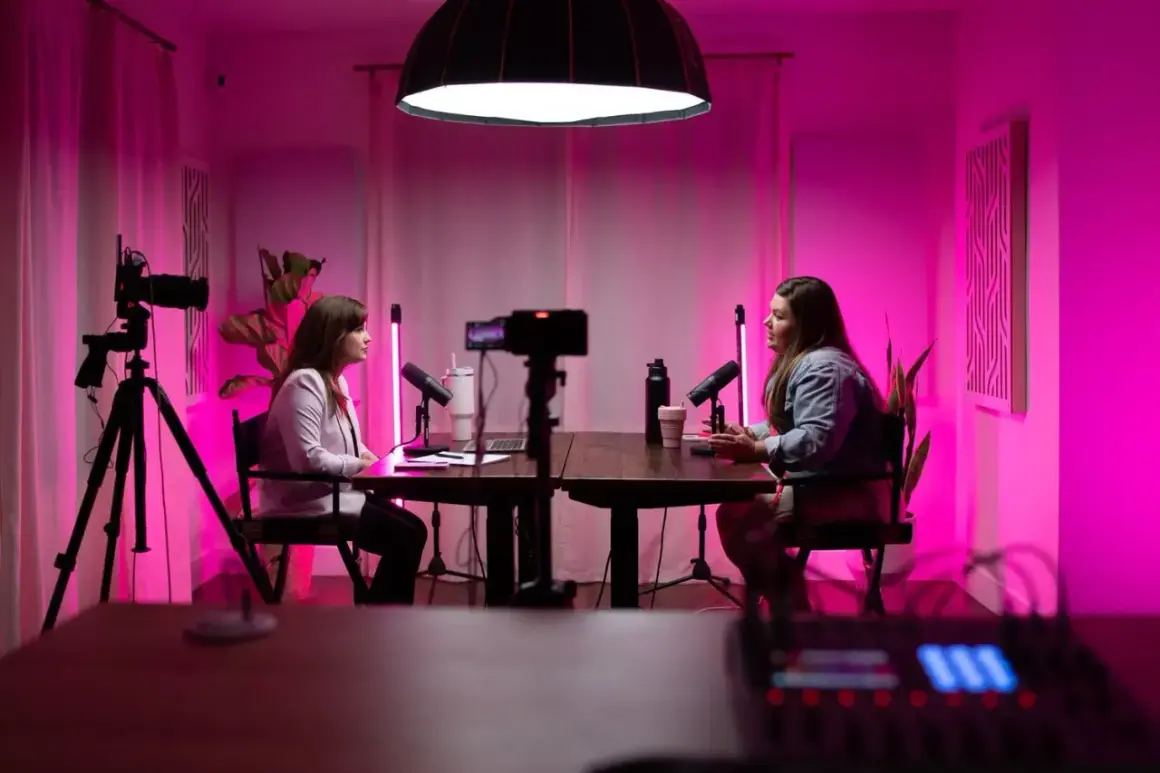
The cleanest podcast images come from soft, controlled light
- Place your main light slightly above eye level and about 30 to 45 degrees off camera.
- Use fill light only to ease shadows, not to flatten the face.
- For most video podcasts, LED panels and softboxes are more flexible than ring lights.
- Match all lights to the same color temperature and set white balance manually.
- Build depth with a subtle background lamp or accent light instead of blasting the whole room.
- Spend first on softness and placement, then on extra effects.
Start with the image you want on screen
When I plan lighting for a podcast, I do not start with the gear list. I start with the look: should the host feel crisp and modern, warm and intimate, or bright and editorial? That choice changes where the lights go, how hard the shadows should be, and how much of the room needs to show up in frame.
The real job of lighting is simple: make faces easy to read, keep skin tones believable, and separate the subject from the background. If the camera sees a flat wall of brightness, the result feels cheap even when the camera itself is decent. If it sees a face with shape, a controlled catchlight in the eyes, and a little depth behind the subject, the whole production level rises immediately.
That is why I treat the room as part of the setup. Windows, computer monitors, glossy frames, and even white desks can all affect the image before the first light is turned on. A strong lighting plan works with the room instead of fighting it, and that is where the difference between amateur and polished usually starts.
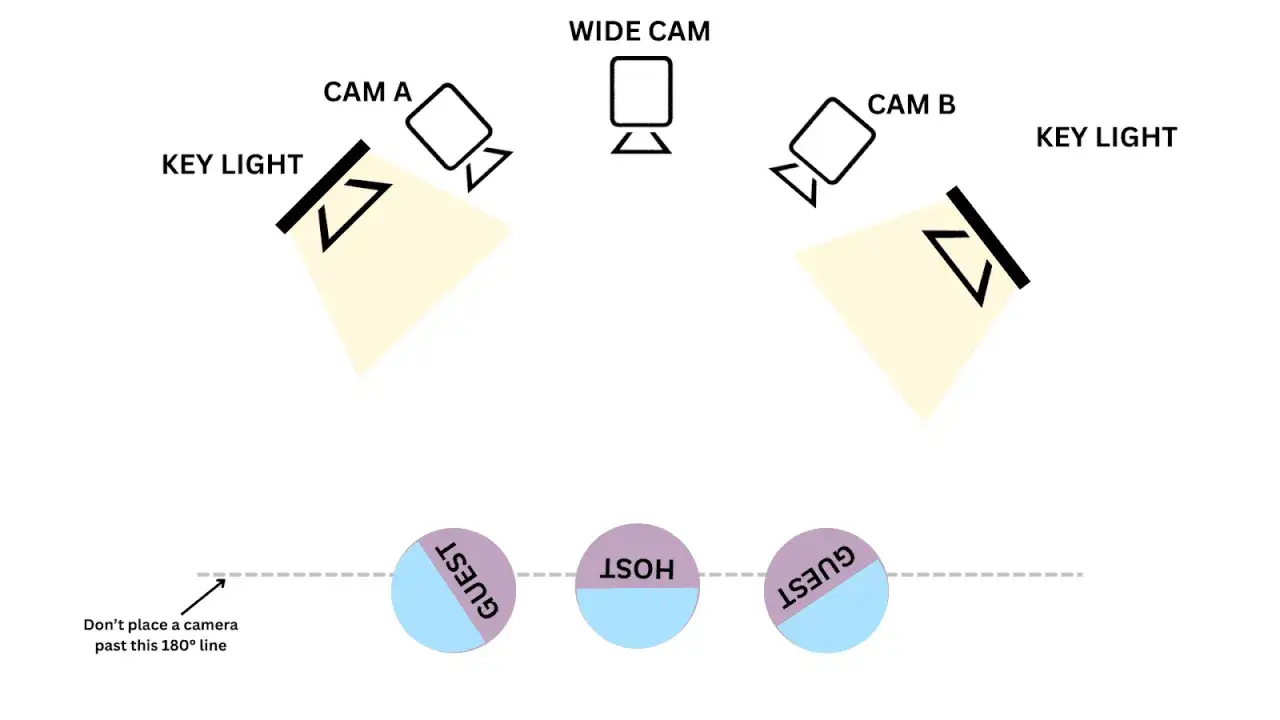
Build a three-light frame that flatters faces
The most reliable structure for a video podcast is still a classic three-point approach: key light, fill light, and back light. You do not always need all three, but understanding the roles makes every setup easier to tune.
Key light
The key light is the main source. I place it slightly above eye level and around 30 to 45 degrees off the camera axis so the face keeps some dimension. A softer key usually looks better than a hard one because it reduces harsh nose shadows and keeps skin texture from becoming the star of the frame.
Fill light
The fill light softens the shadow side of the face. I keep it weaker than the key, often about one to two stops lower, so the image still has shape. In smaller rooms, a white reflector or even bounced light can do this job without adding another powered fixture.
Back light
The back light, sometimes called a hair light or rim light, creates separation from the background. I use it gently. Too much and the subject starts to look cut out; too little and the frame can collapse into the background. For podcasts, subtle usually wins.
If you only have one light, use a large soft source and shape the background with ambient room light. If you have two lights, build a strong key and a restrained fill. Three lights are ideal, but only if they are all doing a job instead of competing for attention. From here, the next question is obvious: which light type gives you the best control for the money?
Choose the fixture that matches your room
I care more about control than brand names. For podcast video, the best fixture is the one that gives you the softness and placement you need without turning setup into a daily hassle. That is also why RØDE and Shure both steer creators toward LED panels or a basic three-point kit for video podcasts rather than relying on a bare bulb and hoping post-production can rescue the image.
| Light type | Best use | Strengths | Tradeoffs | Typical U.S. street price in 2026 |
|---|---|---|---|---|
| Ring light | Solo host, quick face-centered content | Easy setup, even front lighting, good catchlights | Flat look, obvious reflections in glasses, limited depth | $25-$150 |
| LED panel | Most home studios and compact podcast rooms | Adjustable brightness and color, slim footprint, easy to aim | Can feel harsh unless diffused | $40-$300 |
| Softbox | Interview setups, flattering face light, wider rooms | Large, soft source that looks natural on skin | Bulkier, slower to move, takes more floor space | $60-$250 |
| Practical lamp or accent light | Background depth and mood | Adds atmosphere, helps the frame feel designed | Not enough on its own for the subject | $20-$120 |
If I had to simplify the choice, I would say this: ring lights are fine for fast, face-on content, but LED panels and softboxes give you a more natural studio look and age better as your channel becomes more serious. That difference matters because podcast video is usually long-form, repeatable content, not a one-off selfie clip. Once you choose the right fixture, placement becomes the part that makes or breaks the image.
Place lights to solve real room problems
Most lighting mistakes are not really lighting mistakes. They are placement mistakes. A good source in the wrong position can look worse than a modest source placed carefully, and that is especially true in home studios where space is tight.
For glasses
I move the key light higher and angle it downward until the reflection slides out of the lenses. If the subject still catches a hotspot, I shift the light farther to the side rather than simply dimming it. Dimming often fixes glare only by making the whole image worse.
For small rooms
When there is no room for a large light stand, I use a wall bounce, a clamp-mounted panel, or a soft source just outside the frame. Small rooms benefit from softness and restraint. A tiny hard light in a tight room tends to expose every flaw in the wall, the desk, and the subject’s face at once.
For two people on camera
Two-host setups need broader light coverage. I either widen one soft source so it covers both faces evenly or build a matched pair of lights. The main trap is lighting one person perfectly and leaving the other one a stop darker. The camera reads that as imbalance, even if the conversation feels normal.
Read Also: LED Photography Ideas - Make Your Photos Look Professional
For window-lit studios
Window light can be excellent if I can control it. If the daylight changes too much, I block it and make the artificial light do the work. If the window is stable and flattering, I treat it as the key and add a small fill or background light to keep the frame from going flat.
A useful shorthand: the closer the light is to the subject, the softer it looks. That single idea explains why a larger source or a diffused source usually beats a bare panel pointed straight at the face. Once placement is under control, the next layer is color, because bad color balance can make an otherwise clean image look strangely off.
Get color and exposure under control
Lighting only looks professional when the camera and the room agree. I aim for one color temperature across the main sources, usually around 5600K for a daylight-balanced look or around 3200K if the room is built around warmer practical lamps. The important part is not the exact number; it is consistency.
I also avoid auto white balance for recorded podcasts whenever possible. It can drift during a conversation, especially if someone leans forward or a screen changes color in the background. Set the camera manually so the whites stay neutral and the skin tones stay stable. Adobe’s white-balance guidance aligns with this basic rule: if the white point is drifting, the color temperature is drifting too.
For color accuracy, I look for lights with strong color rendering. A CRI or TLCI rating of 90+ is a sensible baseline for most creators, and 95+ is even better if the show cares about skin tone fidelity or product color. That does not mean a lower-rated light is unusable; it means I expect more correction and less consistency from it.
Exposure matters just as much. If the subject is bright but the background is blowing out, the camera feels cheap. If the subject is too dark and the background is full of glowing distractions, the viewer’s eye goes everywhere except where you want it. I prefer a controlled subject exposure with a background that supports the scene instead of fighting it. That balance is what makes the frame feel intentional.
A few setups that actually work
There is no single perfect lighting recipe, but there are a few combinations I reach for again and again because they solve real studio problems without unnecessary complexity.
| Setup | Gear | Why it works | Good for | Ballpark budget |
|---|---|---|---|---|
| One-light starter setup | One large soft LED or small softbox, plus a reflector or bounce card | Soft, flattering, easy to learn, low clutter | Solo hosts, beginner studios, tight budgets | $75-$200 |
| Two-light home studio | Key light and a gentle fill or background lamp | Better face shape and more depth without much complexity | Most interview podcasts and remote recording rooms | $150-$350 |
| Three-light interview setup | Key, fill, and subtle back light | Most control over face shape and separation | Branded video podcasts, guest interviews, long-form content | $300-$900 |
| Hybrid creator setup | Soft key, practical lamp, accent light in the background | Looks designed without feeling overproduced | Shows that want a warmer, more editorial feel | $200-$600 |
If I were helping a creator spend money in the smartest order, I would usually say: buy one good soft key first, then add a background lamp, then add a fill or rim light only if the frame still needs more shape. Most people do the opposite and end up with three lights that each do too little. Simplicity is not a compromise here; it is often the reason the setup looks better.
Watch for the mistakes that make the setup feel amateur
Bad lighting rarely comes from one dramatic error. It usually comes from five small ones that stack up. I see them all the time in podcasts that otherwise have good microphones, clean editing, and decent cameras.
- Lighting straight on from the camera axis. This flattens the face and removes shape.
- Mixing warm and cool sources without intent. One window, one lamp, and one LED set to different temperatures usually looks messy.
- Using a tiny hard light as the main source. It creates sharp shadows that do not flatter most faces.
- Over-lighting the background. Bright walls pull attention away from the host.
- Ignoring reflections. Glasses, glossy tables, picture frames, and monitors can all betray the setup.
The fix is usually practical, not expensive. Move the light, soften it, flag it off the background, or dim the monitor. Negative fill can also help here, which is just a dark surface used to absorb stray light on one side of the face. It is a simple trick, but it can add back the shadow shape that small rooms often lose.
Once those errors are under control, the remaining work is mostly about choosing the right default and keeping it repeatable from episode to episode.
What I would buy first if I were starting from zero
If I had to build a podcast studio in 2026 with a realistic budget, I would keep the order very simple. First, I would buy one soft, adjustable key light with enough output to stay comfortable at low-to-medium brightness. Second, I would get a stand or mounting solution that lets me place it off camera and slightly above eye level. Third, I would add one practical lamp or small accent light to give the background depth.
- One soft key light with adjustable brightness and color temperature.
- A sturdy stand or clamp so placement stays consistent.
- A background lamp or accent source for separation.
- A way to control ambient light, such as curtains or blinds.
- A manual white balance setting on the camera so the look does not drift.
That is the core of a reliable podcast lighting setup: one flattering source, one controlled background, and a camera setting that stays out of the way. If you keep those three pieces stable, you can change cameras, mics, or room decor later without breaking the look. In practice, that is what makes a studio feel finished rather than improvised.
