
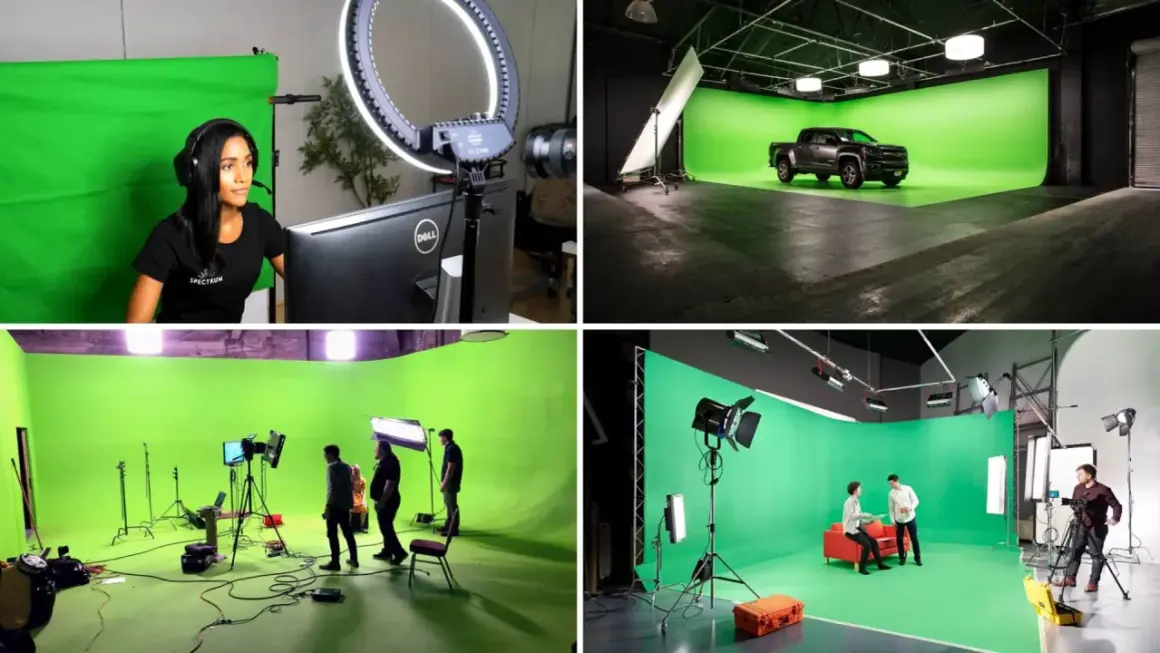
Clean chroma keying starts long before post-production. Good lighting for green screen work is less about raw brightness and more about control: an even backdrop, a separated subject, and enough distance to keep spill off the edges. In this article, I’ll break down the setup choices that matter most, the mistakes that usually cause patchy keys, and the practical tradeoffs I would make in a real shoot.
The setup works when the screen stays even and the subject stays separate
- Light the screen first and aim for a smooth, shadow-free field around 40 to 50 percent luminance.
- Keep the subject a few feet in front of the backdrop so green spill has room to fall off.
- Use soft, diffused sources instead of bare lights when you want a cleaner key.
- Add flags, negative fill, or a subtle rim light when the edges need help separating.
- Match color temperature across every fixture before you start tweaking exposure or key settings.
What a clean key actually needs
I treat chroma key lighting as a separation problem. The background has to read as one consistent color plane, while the subject needs enough modeling to look natural without picking up that same green. If the screen is blotchy, too bright in one area, or throwing color onto skin, the keyer has to work harder and the matte usually gets rougher.
The first rule is simple: light the screen and the subject as two different problems. Adobe has described a practical target of roughly 40 to 50 percent luminance for the screen, and that makes sense in the field because it gives you a strong, usable signal without crushing detail or pushing the backdrop into hot spots. The second rule is separation. The farther the subject sits from the screen, the less spill reaches the hair, shoulders, and outline of the face.
That is why I plan the lighting from the background forward. Once the screen is stable, the subject becomes easier to shape, and the keyer in post has a much cleaner starting point. From there, the real work is in making the green surface behave.
How I light the screen first
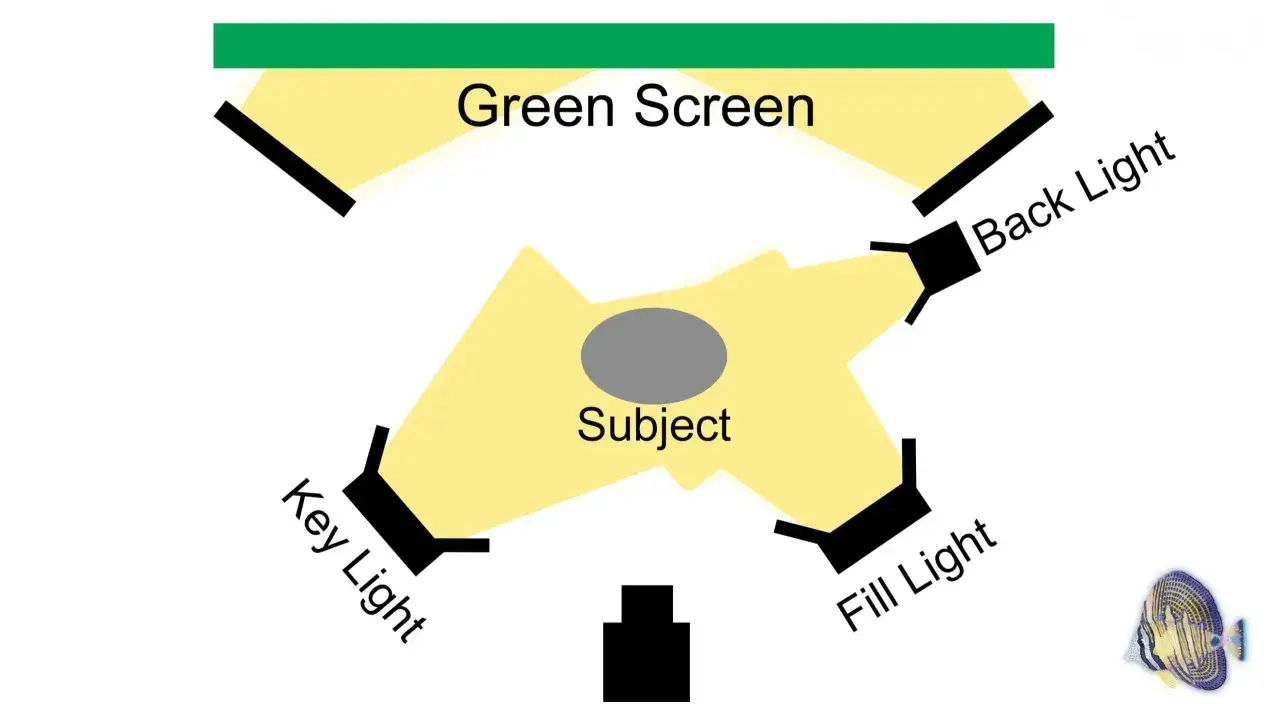
For the backdrop, I want soft, even illumination with no visible gradients. Hard beams create bright islands and dark corners, and those variations show up as noisy mattes once you start keying. If I have only two lights for the background, I place them on opposite sides, feather them slightly across the screen, and keep them far enough away that the spread overlaps in the middle.
When the room is small, diffusion does more work than brute force. A larger soft source, a bounced source, or a fixture pushed through diffusion often gives a cleaner result than a tiny, high-output light aimed directly at the wall. I also watch the edges of the screen, because corners usually fall darker first. If the center is good but the sides drift, I widen the source or move the lights farther back so the falloff becomes gentler.
- Keep the screen flat, stretched, and as wrinkle-free as possible.
- Measure the brightness across the backdrop, not just in the middle.
- Avoid letting the screen pick up shadows from stands, flags, or talent.
- Use the least amount of output that still gives you a clean, even green field.
Once the backdrop is stable, I move to the part that matters just as much in practice: making the subject look believable without contaminating the edge.
How I light the subject without green spill
The subject needs shape, not just exposure. My default is a controlled three-point approach: a key light for the face, a softer fill to keep shadows from collapsing, and a subtle rim or hair light if the subject blends too much into the background. The rim light is especially useful when dark hair, dark clothing, or a profile angle makes the silhouette disappear.
Distance does a lot of the work here. In a comfortable studio setup, I like to start with the subject several feet in front of the screen, often around 4 to 6 feet when the space allows. That gap gives green spill less opportunity to bounce back onto the subject and also makes it easier to keep shadows off the backdrop. In tighter spaces, I will still preserve as much separation as I can, because one extra foot often matters more than another stop of exposure.
Wardrobe and materials matter too. Shiny jackets, glasses, reflective jewelry, and translucent fabrics catch the screen color fast. If a subject must wear something reflective, I usually soften the key, flag the background harder, and keep the rim light restrained so it separates rather than contaminates. Manual white balance also helps here; auto white balance can wander and exaggerate the color cast from shot to shot.My rule of thumb is blunt: if the subject already looks green in camera, post-production is starting behind. The cleaner the separation on set, the less aggressive the keyer has to be later.
Which lights and modifiers make life easier
Not every fixture behaves the same way on a green screen set. I care less about brand names and more about how controllable the source is, how easy it is to diffuse, and how well it can be aimed without contaminating the rest of the frame. In most small and mid-sized setups, soft, dimmable LED lighting is the most flexible option because it is easy to shape and cool to run for longer sessions.
| Light or modifier | Best use | Why it helps | Tradeoff |
|---|---|---|---|
| Soft LED panel | Subject key or small screen fills | Easy to dim, easy to flag, predictable color | Can look harsh if used bare |
| Softbox | Flattering subject light and broad background coverage | Creates a larger, gentler source | Takes more space and rigging time |
| Tube light | Tight rooms, edge accents, quick setups | Flexible placement and fast adjustment | Often needs help to cover larger screens evenly |
| Fresnel with diffusion | Controlled subject shaping | Strong output with precise aim | Too punchy if left undiffused |
| Flags and negative fill | Stopping spill and tightening edges | Improves separation without adding more light | Requires room and careful placement |
If I had to simplify the buying decision, I would choose control over raw output. Two or three controllable soft sources, plus a few flags, usually outperform one very bright light that is hard to shape. That is especially true for green-screen lighting, where spill control is often more important than sheer power.
The mistakes that cost the most time in post
The biggest failures are usually boring, which is exactly why they get repeated. Uneven lighting is the obvious one, but it is not the only one. A screen lit from one side, a subject parked too close to the backdrop, and mixed color temperatures can all turn a simple key into cleanup work.- Hot spots on the screen make the keyer chase different shades of green.
- Shadows on the backdrop create patches that either key badly or need manual repair.
- Subject too close to the screen increases spill and makes edges harder to isolate.
- Mixed daylight and tungsten sources produce color shifts that are annoying to correct.
- Auto exposure or aggressive gain adds noise, which the keyer interprets as texture.
- Clothing or props that reflect green can disappear or fringe out in post.
There is also a subtle mistake I see a lot: people try to fix lighting problems with key settings alone. That can help at the margins, but it does not replace a properly lit set. If the footage is noisy, uneven, or contaminated by spill, the software can only do so much before the edge starts looking cut out rather than photographed.
A small-room setup that still holds up
Not every shoot gets a roomy studio, and that is where discipline matters most. In a small room, I would rather use a smaller but well-lit green area than stretch a large backdrop across a space that cannot support it. The goal is not coverage at any cost. The goal is a clean, usable key.
- Place the screen flat and keep the talent as far forward as the room allows.
- Light the backdrop first with soft, overlapping sources until the color reads even across the full frame.
- Use flags or black fabric on the subject side to absorb stray bounce.
- Keep the subject light soft enough to flatter skin but directional enough to preserve edge shape.
- Check the camera monitor for shadow falloff, spill on hair, and any fabric that reflects the screen color.
- Record a test clip and pull a rough key before you commit to the full shoot.
If I had only one adjustment to make in a tight room, I would prioritize separation before anything else. Extra distance and a little negative fill usually improve the result faster than adding another light. The space may be limited, but the logic stays the same: even background, isolated subject, minimal spill.
What I would prioritize when time is tight
When the schedule is collapsing and the crew wants to move on, I reduce the setup to the few decisions that change the outcome most. First, I make the screen even. Second, I move the subject forward until the spill drops. Third, I soften the key and remove anything reflective that will fight the matte. That sequence gets me farther than obsessing over minor exposure tweaks before the basics are right.
My final habit is to keep a short test shot from every setup that works. It gives me a reference for lighting angle, separation, and brightness if the set has to be rebuilt later in the day. That small discipline saves time, and on a keyed shoot time is usually the expensive part.
If you remember only one thing, make it this: a clean key starts with disciplined light on set, not with a heroic repair in post. Once the screen is even and the subject is kept cleanly apart from it, the rest of the workflow becomes much more forgiving.
