
The flash sync speed is the ceiling that decides whether your flash and shutter work together or fight each other. Once you understand that limit, it becomes much easier to choose between normal sync, HSS, or a leaf-shutter setup, especially when you are shooting portraits or product work in bright light. I’m going to cover the mechanics, the numbers that matter, and the tradeoffs that actually affect real shoots.
Key takeaways for getting flash and shutter timing right
- Most focal-plane cameras sync around 1/125 to 1/250 second, with some reaching 1/320.
- Once you go past that ceiling without HSS, the frame can show a dark band because the shutter curtains are no longer fully open.
- High-speed sync can push you to much faster shutter speeds, often up to 1/8000 second, but it costs flash power.
- For bright outdoor portraits, HSS is useful; for maximum flash output, native sync is usually the better choice.
- Compatibility matters: the camera body, flash, and trigger all need to support the same sync mode.
Why the sync ceiling exists
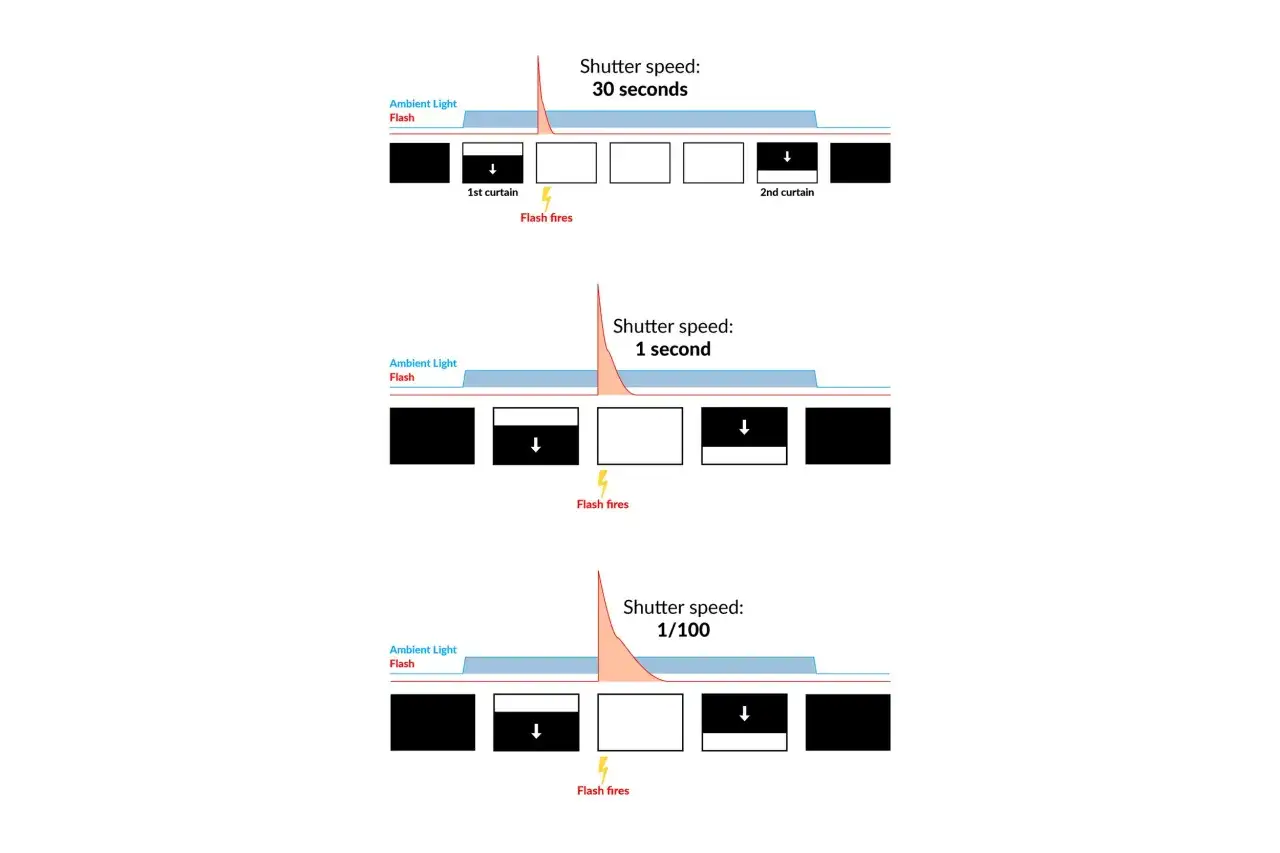
In normal flash photography, the flash fires when the sensor is fully uncovered. At slower shutter speeds, the first curtain opens all the way before the second curtain starts to close, so the whole frame gets the burst of light at once. Once you go faster than the camera’s native sync point, the second curtain starts moving before the first curtain has cleared the frame, and the sensor is exposed through a narrow moving slit instead of one open window.That is why the failure mode is so recognizable: a dark band usually appears on one edge of the image, because part of the frame never sees the flash burst. I think of this as a timing problem first and an exposure problem second. In standard sync, shutter speed mainly affects the ambient light, while aperture, ISO, and flash power do most of the work for the flash exposure itself.
Once you see that mechanical limit, the next question is not how fast the camera can go, but which sync method your setup actually supports.
The speeds you will actually see in real cameras
Most cameras fall into one of three practical buckets. A focal-plane body with a hot-shoe flash usually has a native ceiling between 1/125 and 1/250 second, with some models offering 1/320. High-speed sync can go far beyond that, often up to 1/8000 second, while a leaf shutter can sync at every speed the lens allows.
| Setup | Common sync range | What it gives you | Main tradeoff |
|---|---|---|---|
| Native focal-plane sync | About 1/125 to 1/250 second | Best flash efficiency and simplest setup | Can’t go faster without risking banding |
| High-speed sync | Often up to 1/8000 second | Lets you shoot wide open in bright light | Loses power, range, and battery life |
| Leaf shutter | All shutter speeds the lens supports, often up to 1/2000 or 1/4000 second | Full flash use at very fast shutter speeds | System-specific and usually more expensive |
That last option is the cleanest technically: the shutter is built into the lens, so the whole frame can be exposed evenly for flash use at much faster speeds. For most photographers, though, the real decision is between native sync and HSS. Once you know where your camera sits, the practical tradeoff becomes much easier to judge.
When high-speed sync earns its place
HSS is a problem-solver, not a default. I reach for it when I want a wide aperture outdoors, need to darken a bright background, or want to keep shutter speed high without adding a neutral density filter. It works by pulsing the flash while the shutter slit travels across the sensor, which is clever, but it spreads the light out over time instead of delivering one strong burst.
- Best for: daylight portraits at f/1.8 or f/2.8, fill flash under a bright sky, and situations where the background is too bright at native sync.
- Not ideal for: long working distances, big softboxes, large groups, or any setup where you already need every bit of flash power.
The tradeoff is real. In HSS, effective range drops, recycle times can feel slower, and battery drain climbs. If I only need to cut ambient light and preserve flash power, I often prefer a small ND filter instead of forcing the flash to work harder. That choice matters most when the light is strong and the subject is far from the flash.
Knowing when HSS helps is useful, but the next step is making sure your gear is actually set up to use it.
How I would set it up before a shoot
My first pass is always mechanical: confirm the camera’s native sync ceiling, then check whether the flash and trigger support HSS or Auto FP. After that I set a baseline exposure at native sync, usually in manual mode, and only then do I push the shutter faster if the scene really needs it.
- Check the camera manual for the native sync limit and the name of the sync setting your system uses.
- Set a starting point at native sync, base ISO, and a mid-range aperture such as f/4 or f/5.6.
- Add flash and expose the subject first, because flash power and aperture shape the flash exposure more than shutter speed does.
- If the background is too bright, raise shutter speed or enable HSS, depending on what your gear supports.
- If flash output drops too far, back off and consider moving the light closer or using an ND filter instead.
Some systems switch HSS on the flash, others in the camera menu, and some need a compatible trigger as well. I always test the whole chain together before I trust it on a paid shoot. That habit avoids the kind of small compatibility problem that turns into a big lighting headache on location.
The mistakes that cause dark bands and weak flash
Most sync failures are boring once you know what to look for. They are usually not mysterious camera defects; they are mismatches between the shutter, flash, and the mode you selected.
- Exceeding the ceiling without HSS: the frame shows a dark band because the second curtain is already moving.
- Assuming shutter speed changes flash power in normal sync: it mostly changes ambient, so you can waste time adjusting the wrong control.
- Using HSS too early: if your modifier already eats light, HSS can make the setup unnecessarily weak.
- Ignoring compatibility: a body, flash, and trigger can each work fine on their own and still fail together.
- Forgetting bounce and modifiers: every extra foot of distance and every layer of diffusion makes the HSS penalty hurt more.
When the image looks wrong, I check the sync mode before I touch exposure compensation or flash power. That habit saves more time than any clever workaround, and it usually tells you whether the problem is timing, power, or compatibility.
Choosing the right sync strategy for real-world lighting
The best choice depends on what you are trying to protect: flash power, aperture, or ambient control. I rarely choose a sync strategy in the abstract; I choose it against the lighting problem in front of me.
| Situation | Best choice | Why I would pick it |
|---|---|---|
| Indoor portrait with a softbox | Native sync | You get more efficient flash output and usually do not need a faster shutter. |
| Outdoor portrait at noon with a wide aperture | HSS or a leaf shutter | You need to hold exposure down without stopping the lens too far down. |
| Event or reception work | Native sync first | It keeps flash power stronger and recycle times more predictable. |
| Product or still-life work | Native sync | Controlled light usually matters more than very fast shutter speeds. |
| Daylight fashion on medium format with leaf shutters | Leaf shutter | You can keep flash efficient at very fast shutter speeds without the usual sync ceiling. |
For a beach portrait at f/2, I would rather use HSS or a small ND filter than force the shot at a slower shutter if the sky is too bright. For a studio headshot, I would stay at native sync and use the flash at full efficiency. That simple split keeps the lighting decision tied to the job instead of to the novelty of a faster shutter.
The preflight check that saves the shot
Before I leave for a shoot, I test the body, flash, trigger, and batteries together at native sync, then once more one stop faster if I know I will use HSS. If I see banding, weak output, or a slow recycle, I fix it before the real session starts. That is the fastest way to keep the sync ceiling from becoming a surprise on location.
- Pack a spare flash battery, not just a spare camera battery.
- Keep a 3-stop or 6-stop ND filter in the bag if you often shoot wide open in daylight.
- Know your camera’s native sync ceiling from memory, because that number shapes every flash decision.
When those basics are in place, flash timing stops feeling fragile and starts behaving like a normal part of your lighting workflow.
