
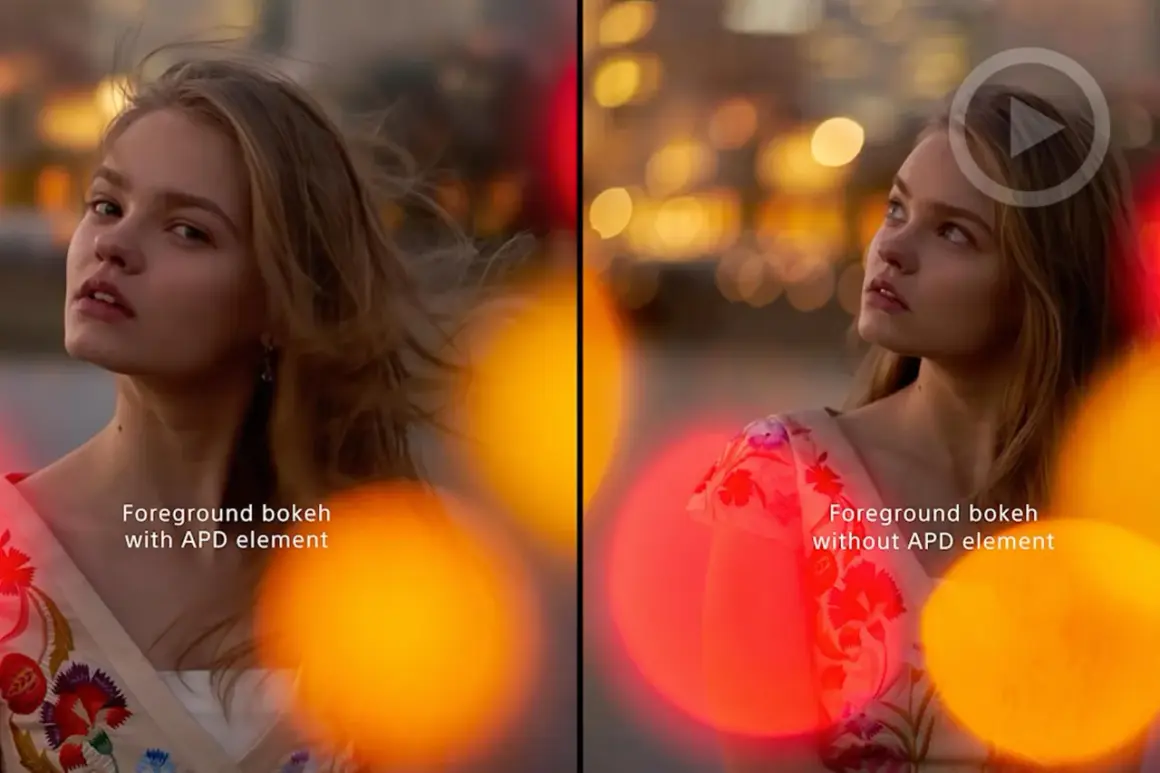
Beautiful background blur is not a magic setting. It comes from a mix of lens design, aperture choice, subject distance, and the way highlights are rendered at the edge of the frame. In practice, what people often call bokeh lenses are lenses that make the out-of-focus parts of a scene look soft, calm, and useful instead of messy. This guide breaks down what actually affects that look, how to get more of it with the gear you already own, and which lens types make the most sense for portraits, products, and video.
The fastest way to judge a lens for pleasing blur
- Blur quality is not the same as blur amount. Depth of field controls how much falls out of focus; bokeh describes how that blur looks.
- Wide apertures help, but they are only part of the equation. F/1.4 and f/1.8 make separation easier, yet subject placement matters just as much.
- 85mm to 135mm is a reliable portrait range. Those focal lengths usually make subject isolation easier without making faces look distorted.
- Prime lenses are the simplest route to shallow depth of field. Zooms win on flexibility, but many need to be used at the long end to compete.
- Filters can support the look, not replace it. Diffusion and ND filters change rendering or exposure; they do not turn a slow lens into a blur machine.
What bokeh actually means in a lens
Bokeh is the quality of the out-of-focus areas, not just the fact that those areas are blurred. That distinction matters because two lenses can both throw the background out of focus, yet one renders soft circles and smooth transitions while the other produces nervous edges, hard lines, or distracting highlight shapes. When I evaluate a lens, I am looking for how it handles the background, not just how much background it hides.
That is why a portrait shot can feel polished even when the scene behind the subject is busy. Good blur gives the eye a clean place to rest. It separates the subject without making the image look artificial, which is exactly why this topic matters for editorial work, product photography, and branded content. If the background blur looks harsh, the whole frame can feel cheaper than it should.
One useful shortcut: depth of field is a technical measurement, while bokeh is the visual experience of that blur. Once you separate those two ideas, the spec sheet starts to make more sense, and the next step is figuring out which lens traits create that smoother rendering.
Which lens traits shape the blur you see
| Lens trait | What it affects | What I look for |
|---|---|---|
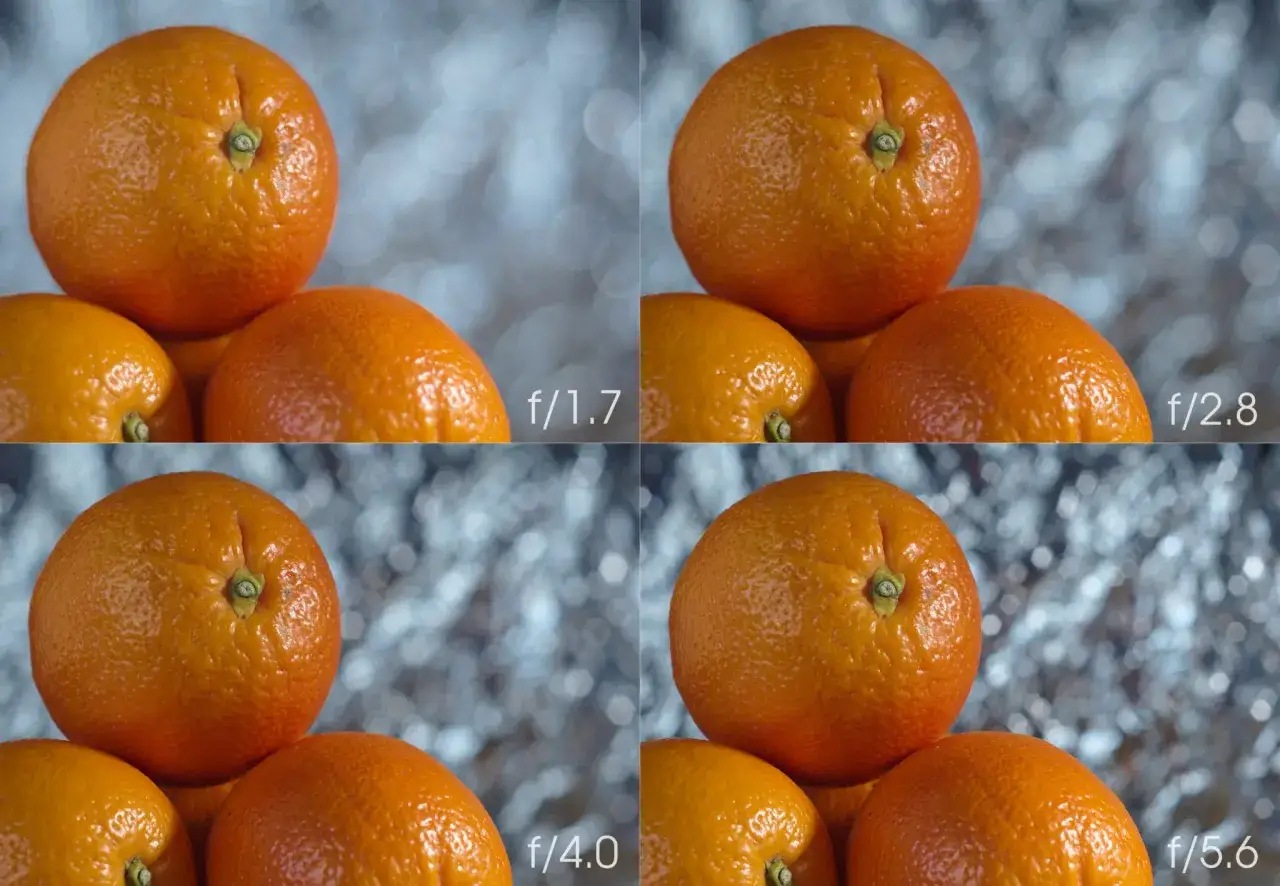
| Maximum aperture | How shallow the depth of field can get | F/1.2, f/1.4, and f/1.8 are the easiest routes to strong separation; f/2.8 is still very usable |
| Focal length | How large the background appears relative to the subject | 85mm to 135mm for portraits; 70mm and up when background blur matters |
| Aperture blade design | The shape of out-of-focus highlights | Rounded or circular blades tend to give softer, more circular highlight discs |
| Minimum focus distance | How close you can get to the subject while still focusing | Shorter close-focus distances for product shots, food, and detail work |
| Sensor format | How easily the system produces shallow depth of field at the same framing | Full frame usually gives more isolation than APS-C or Micro Four Thirds at the same aperture |
I would not buy a lens on aperture alone, though. A wide aperture helps, but if the diaphragm blades are angular, the background can still look geometric rather than creamy. Likewise, a longer focal length can make a scene feel more compressed, but only if the subject and background are placed well enough apart for the effect to show up.
The practical takeaway is simple: smooth blur is a combination of optics and distance. That leads directly to the part many photographers skip, which is how to increase blur without spending anything.
How to get more blur with the gear you already own
Before I recommend a new lens, I usually try to squeeze more out of the one already in the bag. In a lot of real-world shoots, especially for web content and social campaigns, the biggest improvement comes from changing where you stand and where the subject sits, not from changing cameras.
Open the aperture first
Use the widest practical aperture your lens allows. If your lens is a 50mm f/1.8 or 85mm f/1.4, start wide open and check the image at 100 percent. Fast glass is the easiest route to shallow depth of field, although I still stop down a little if the lens is visibly soft or if the eyes need more depth in a close portrait.
Move the background farther away
This is the trick beginners underestimate. A subject placed two meters from a wall will separate far better than the same subject standing close to it. You can even get visible blur at smaller apertures when the background is far enough away. If the scene allows it, move the subject forward and let the background fall back.
Use focal length for framing, not just reach
Longer focal lengths tend to make background blur feel more prominent because they magnify the background relative to the subject. That is one reason 85mm to 135mm is such a reliable portrait range. The face stays natural, the perspective feels flattering, and the background usually shrinks into something much easier to ignore.
Read Also: Color Fringing - Fix It In-Camera & Post-Production
Choose a background that can blur well
A plain wall, foliage with lights behind it, city reflections, or a row of lamps will all blur differently. If the background is full of chaotic textures, the blur can still feel busy. When the background has small points of light, the lens has a chance to show off smoother highlight discs instead of a flat wash of gray.
Once those variables are under control, the next question is whether a prime or a zoom fits your workflow better, and where filters actually belong in the conversation.
Prime lenses, zooms, and the real role of filters
If your only goal is the shallowest depth of field possible, a fast prime usually wins. Primes tend to offer wider maximum apertures, simpler handling, and a cleaner path to background separation. A 50mm f/1.4 or 85mm f/1.8 will usually make pleasing blur easier to achieve than a slow kit zoom. That said, zooms are not the enemy here.
| Option | When I reach for it | Main trade-off |
|---|---|---|
| Fast prime | Portraits, beauty work, low-light scenes, controlled product shots | Less framing flexibility |
| Constant-aperture zoom | Events, documentary work, travel, run-and-gun video | Heavier, more expensive, often a little slower than a prime |
Modern constant-aperture zooms can produce excellent blur, especially in the 70-200mm f/2.8 class. They are not as compact as a prime, but they let you adapt fast when the subject keeps moving. For commercial work where time matters, that flexibility can outweigh the slight rendering advantage of a prime.
Filters are a different story. A diffusion filter softens bright areas and adds glow, which can make highlights feel gentler and more cinematic. An ND filter reduces light so you can keep the aperture wide open in daylight. Neither one creates bokeh by itself. They influence the look around the blur, or let you preserve a wide-open aperture when the light would otherwise force you to stop down.
I would treat protective UV filters as protection, not image-shaping tools. A polarizer helps with reflections and contrast, but it does not create the kind of background separation that people usually want when they talk about blur-friendly lenses. From there, the real decision becomes which focal length suits the type of image you make most often.
The lens types I’d shortlist for common shooting jobs
When I narrow the field, I think in terms of use case first and brand second. The lens that feels ideal for a headshot session may be the wrong tool for a food shoot or a handheld video interview. The table below is how I would shortlist options if I wanted pleasing blur without overcomplicating the purchase.
| Shooting job | Lens range I’d favor | Why it works | Trade-off |
|---|---|---|---|
| Portrait headshots | 85mm to 135mm, ideally f/1.8 to f/1.4 | Natural perspective, easy subject isolation, flattering facial rendering | Needs more working space than a normal lens |
| Lifestyle and brand content | 50mm to 85mm, f/1.8 or faster | Mixes subject separation with enough context for storytelling | Too wide open can feel shallow if focus is missed |
| Product and detail shots | Macro or short telephoto lenses around 90mm to 105mm | Close focusing and clean background control | Framing can get tight in small spaces |
| Events and documentary work | 70-200mm f/2.8 | Strong blur at the long end plus framing flexibility | Heavier and less discreet than a prime |
| Food and tabletop | 50mm or 85mm with a close minimum focus distance | Lets the subject stay sharp while the environment softens quickly | Requires careful styling and clean surfaces |
If you shoot on APS-C or Micro Four Thirds, the equivalent focal lengths shift, but the logic stays the same: look for a fast normal or short telephoto lens rather than chasing a number that sounds impressive on paper. The lens has to suit the working distance, the subject, and the room you actually have.
That brings me to the part I check before I trust any lens with client work or a production shoot.
What I check before buying a blur-friendly lens
Spec sheets tell you what a lens can do; sample images tell you what it actually does. I look for a few things that are easy to ignore when a product page is full of marketing language.
- Autofocus reliability. A lens that creates gorgeous blur is still a problem if it misses the eyes in a portrait or hunts in video.
- Highlight rendering. I check whether out-of-focus lights look smooth or whether they show hard edges, onion rings, or distracting texture. Onion-ring bokeh means concentric rings inside highlight discs, usually from the optical design.
- Corner behavior. Cat’s-eye bokeh happens when highlights near the frame edges clip into oval shapes. That can be attractive, but too much of it can feel uneven.
- Minimum focus distance. This matters more than many buyers think, especially for product work, food, and detail shots.
- Handling and weight. A very heavy lens may be optically excellent and still be a poor choice if you plan to shoot handheld for long periods.
- Focus breathing. For video, this is the subtle change in framing that happens while focusing. A lens can be beautiful in stills and annoying in motion.
My rule is simple: if the lens renders blur beautifully but makes the rest of the workflow worse, it is not the right lens for the job. The best choice is the one that gives you the look you want without slowing the shoot down or forcing you to fight the image in post.
Choose rendering that fits the job, not just the blur
The smartest lens choice is rarely the most dramatic one. For portraits, I would still start with a fast 85mm or a good 50mm. For event work, I would trust a strong zoom before I trusted a fragile workflow. For product and content production, I would care just as much about autofocus, close focus, and consistency as I would about blur quality.
If you want the shortest path to cleaner background separation, keep three things in mind: use a wide aperture, give the background room to fall away, and choose a focal length that matches the subject. Filters can refine the look, but they are supporting tools, not the foundation. That is the practical lens choice I would make if I needed pleasing blur that still holds up in real assignments.
