
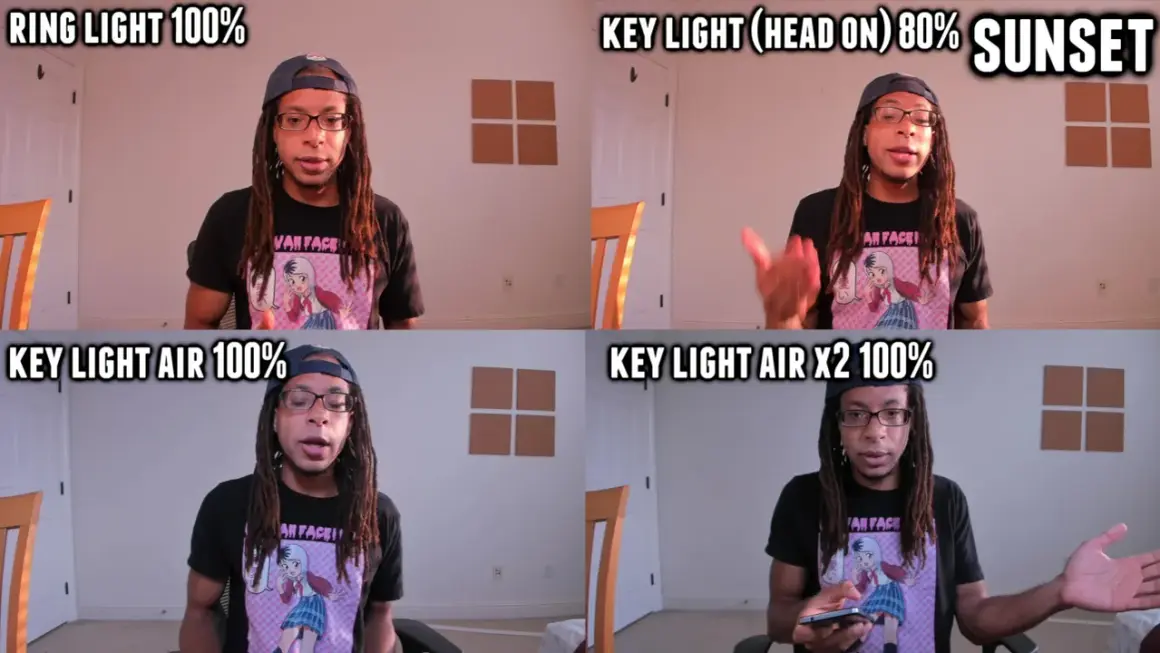
Choosing between a ring light and a panel light comes down to more than brightness. The shape of the source changes shadow edge, catchlights, how close you need the light, and whether the final image feels polished or clinical. In this article I break down the ring light vs panel light decision, show where each one works best, and explain how to set either one up for streaming, talking-head video, portraits, and product work.
The quickest way to pick the right light
- Ring lights are best when you want a centered, face-forward look with a clean circular catchlight and very even illumination.
- Panel lights are better when you want more direction, more shape in the face, and more control over interviews or product shots.
- If you wear glasses, panels are usually easier to place without obvious reflections.
- If your setup is tiny and you want something fast, a ring light is simpler to live with.
- If you want one light that can do several jobs, a bi-color LED panel is the more flexible long-term buy.
How the light shape changes the image
The biggest difference is not just the lamp itself, but the way the light reaches the subject. A ring light wraps around the lens, so the camera sits close to the center of the source. That creates a very even, symmetrical look with minimal shadow, plus the obvious circular catchlight in the eyes. It is flattering in a narrow, specific way: clean skin, tidy shadows, and a look that feels built for the front camera.
A panel light works differently. It is a flat, rectangular source that you can place off to one side, above the subject, or farther back and softened through diffusion. That extra placement freedom matters. It lets me shape the face a little more naturally, keep some shadow for depth, and avoid the overly centered look that a ring can create. In lighting terms, this is the difference between a tool that simplifies the image and one that gives you more room to sculpt it.
One rule matters more than the brand on the box: the apparent size of the source relative to the subject. Move either light closer and it looks softer; move it farther away and it gets harder. The panel usually wins on control because it can be positioned in more ways, while the ring light wins when you want a fast, predictable result with almost no thinking. That tradeoff becomes much clearer once you look at real use cases.
When a ring light is the better tool
I reach for a ring light when the shot is built around the face and the setup needs to be quick. It works well for makeup tutorials, skincare demos, selfie-style short video, and simple live streams where the subject stays near the camera. If the content is intentionally personal and direct, the ring-shaped catchlight becomes part of the style rather than a distraction.
Ring lights are also practical when desk space is tight. A 10 to 18 inch model can sit close to the camera, cover the face evenly, and keep the whole setup compact. That compactness is a real advantage for creators who move between a bedroom desk, a home office, and a temporary shooting corner. It is one of the few lights that can feel “good enough” almost immediately.
Still, there are limits. A ring light can flatten the face if it is the only source and placed too close to the lens axis. It can also create obvious reflections in glasses, which makes it less forgiving for interviews or educational videos. And once the scene expands beyond one face, the effect can start to feel narrow and a little repetitive. That is where panel lights begin to pull ahead.
When a panel light gives you more control
Panel lights are the safer default when the content needs to look a bit more deliberate. For talking-head YouTube videos, interviews, product demos, remote meetings, and hybrid photo-video work, a panel gives me options that a ring light simply does not. I can move it off-axis, feather it across the face, use it as key light or fill light, and shape the background without rebuilding the whole setup.
That flexibility also helps when texture matters. A product, a garment, a tabletop scene, or a portrait with more dimensionality usually benefits from light that is not perfectly centered. A panel can still be soft, but it does not force the same symmetrical look. It lets you keep some contour in the cheekbones, some shadow under the jaw, and a more natural separation between subject and background.
For glasses wearers, panel lights are often easier to manage. I can raise the panel slightly above eye level, angle it down, and move it a little farther to the side so the reflection stays out of frame. That sounds small, but in practice it saves a lot of retakes. The tradeoff is that panels can look harsh if they are used bare and too close. If the light source is small and undiffused, the result can be less flattering than a modest ring light.
Ring lights and panel lights side by side
Here is the comparison I would actually use before buying. If you only remember one line, make it this: ring lights simplify the look, panel lights expand the look. That single idea explains most of the practical difference between them.
| Criterion | Ring light | Panel light |
|---|---|---|
| Shadow style | Very even, with little facial shadow and a centered look | More directional, so you can keep shape and depth |
| Catchlight | Circular and very noticeable | Rectangular or soft-edged, depending on the panel |
| Best working distance | Usually close, around 2 to 4 feet for face content | More flexible, often 3 to 6 feet with diffusion for interviews |
| Best use cases | Makeup, skincare, selfie video, quick livestreams, close-ups | Talking-head videos, interviews, product demos, office lighting |
| Main limitation | Can look flat, stylized, or reflective in glasses | Can look harsh if used bare or without enough diffusion |
| Setup flexibility | Fast and simple, but less adaptable | More adjustable for angle, height, and scene shaping |
If I were choosing for a creator who only films face-to-camera content, I would still consider a ring light a reasonable buy. If I were choosing for someone who might later add product shots, interviews, or a second subject, I would start with the panel. That is usually the better investment because it keeps more doors open.
How to set either one up so it looks clean
The difference between “cheap-looking” and “intentional” lighting is often placement, not price. A ring light or panel can both look solid if the source is the right size, close enough to act soft, and not blasting straight into the face from a bad angle.
- Keep the light close enough to stay large relative to the subject. For a ring light, that usually means roughly 2 to 4 feet away. For a panel, 3 to 6 feet with diffusion is a common starting point.
- Raise the light slightly above eye level and angle it down a little. That keeps the face from looking flat or unnatural.
- With panels, feather the beam a bit so the subject catches the edge of the light rather than the brightest center. Feathering means aiming the source slightly away from the face to soften the hit.
- For glasses, move the light off-axis until the reflection leaves the lens. Panels make this easier, but a ring light can also work if it is positioned carefully.
- Match the color temperature to the room. In practical home setups, a bi-color range around 3200K to 5600K covers most indoor situations without making the image feel mismatched.
- Do not confuse brightness with quality. A dimmable light with stable color and a clean stand is often more useful than a brighter one that wobbles or shifts color when you lower the output.
One more detail matters in 2026: I would look for CRI and TLCI values of 95 or higher if color accuracy is important. That is especially useful for skin tones, product colors, and any work where you do not want the image drifting green, magenta, or muddy.
What I would buy first for common creator setups
If you are trying to avoid buyer’s remorse, match the light to the work you actually do most often. That sounds obvious, but a lot of people buy for the look of the gear instead of the shape of the content.
- Beauty, skincare, and close-up tutorials: ring light first. It gives a centered look that fits front-facing content and makes setup easy.
- Solo talking-head videos and interviews: panel light first. It gives more shape and is easier to place naturally in frame.
- Home office video calls: panel light first. It is less likely to create obvious eye reflections and usually looks more natural on camera.
- Product reviews and unboxings: panel light first. You can light both your face and the product without starting over.
- Travel or ultra-compact setups: ring light if the content is mostly face-forward, small panel if you want more flexibility.
- One-light creator kit with room to grow: bi-color panel first, ring light later only if you want the specific ring-shaped look.
Size also matters. A 10 to 12 inch ring light is usually a close-range tool, while a 14 to 18 inch model is more forgiving for talking-head work. For panels, the common sweet spot is the compact 1x1 class or a small desk-mounted panel if you are working in a tight room. Bigger is not automatically better, but a larger source usually gives you more usable softness at the same distance.
The simplest buying rule for 2026
If your content is mostly face-forward and you want a quick, flattering, recognizable look, a ring light is still a valid choice. If you want one light that can grow with your channel, handle more than one shooting style, and stay useful as your setup becomes more serious, I would buy the panel first.
The safest shortcut is this: choose the ring light for symmetry and speed, choose the panel for control and versatility. That is the real decision behind the ring-shaped versus flat-panel debate, and once you frame it that way, the right answer usually becomes obvious.
