
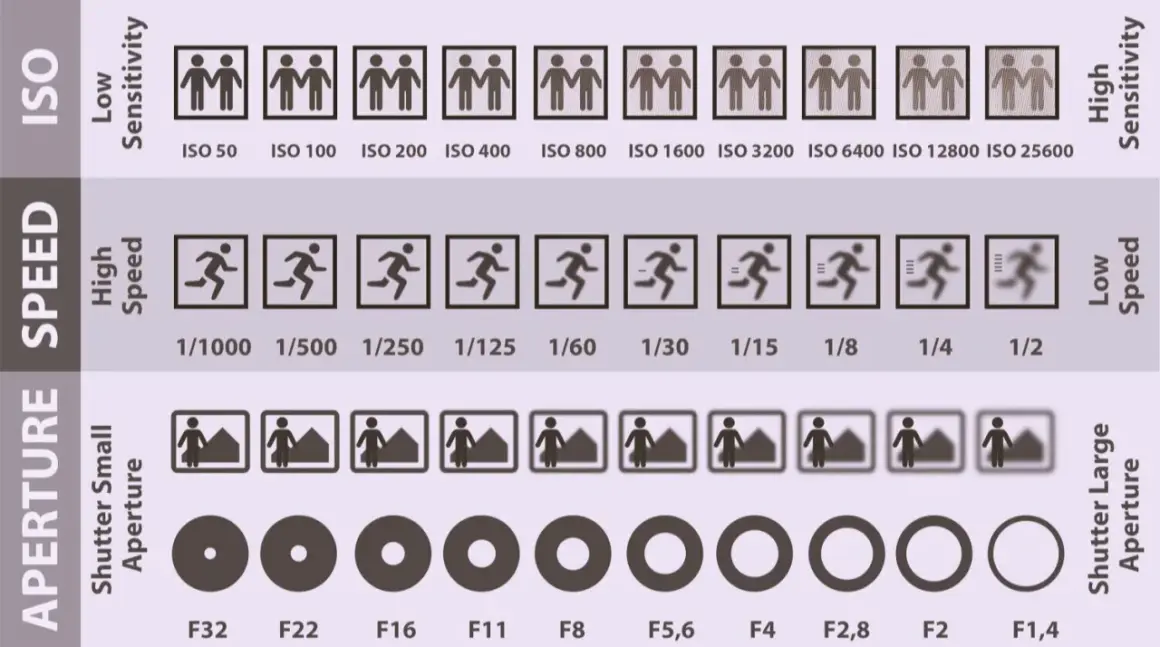
Learning how to photograph indoors starts with one simple truth: the room is usually the constraint, not the camera. Good indoor images come from clean light, stable exposure, and a framing choice that fits the subject, whether you are shooting a portrait, a product, a meal, or a small interior space. I’ll focus on the decisions that change the result quickly, not the settings that look clever but rarely help.
Indoor shots improve fastest when the light is simple and the exposure is steady
- Use one main light source when you can, usually a window or a bounced flash, and keep mixed lighting to a minimum.
- Start with a wide aperture for people, a smaller aperture for interiors and products, and adjust shutter speed so motion stays sharp.
- Raise ISO only as much as your camera can handle cleanly; a bright, slightly noisy file is usually better than a dark, blurry one.
- Set white balance intentionally, especially when daylight and warm lamps are sharing the same room.
- Match the setup to the subject: portraits, food, products, and interiors all need different framing and depth of field.
The quickest gains come from cleaning up the light
In indoor spaces, light quality matters more than gear. I usually begin by asking where the cleanest light is coming from, then I move the subject or the camera until the face, product, or scene is shaped by that light instead of being flattened by it.
Start with the best natural light you already have
A window with indirect daylight is often the easiest starting point. I place the subject near it, turn them slightly toward the window, and use a sheer curtain or white wall as a diffuser if the shadows are too hard. The goal is not maximum brightness; it is even, directional light that still shows texture.
Keep mixed lighting under control
In many US homes, a room has cool daylight from one side and warm LEDs or tungsten lamps from the other. That color clash is what makes skin tones look muddy and white walls look oddly green or orange. I usually switch off unnecessary lamps, keep one dominant light source, and let the camera see a simpler color problem.
Use bounce or diffusion when daylight is not enough
If the room is dark, a bounced flash or a small continuous light can work better than pushing the camera into a noisy exposure. I prefer bouncing flash off a ceiling or pale wall because it enlarges the light source and softens shadows. Direct flash is still useful in some situations, but only when I want a very crisp, editorial look or I have no better way to control motion.
Ceiling fixtures are rarely flattering on their own, so I treat them as fill, not the main source, unless the scene calls for a harder look. Once the room is lit in a cleaner way, the camera settings become much easier to tune, which is where the next decision starts.
Choose settings that keep the file usable, not just bright
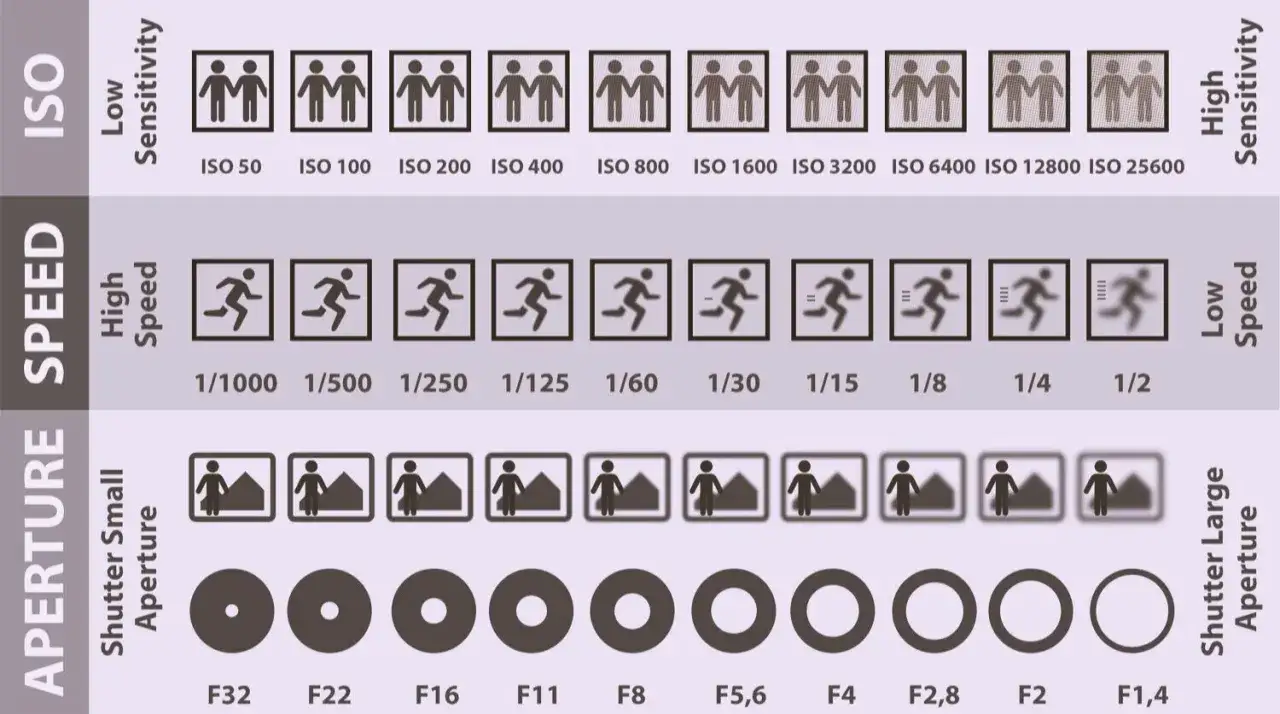
Indoor photography is mostly a balancing act between aperture, shutter speed, and ISO. I want enough light, but I also want detail I can actually use later, so I treat the settings as a way to protect sharpness and color rather than as an afterthought.
Use a realistic shutter speed for the subject
For static subjects, 1/60 second can be workable handheld if I am steady and the lens is not too long. For people, I usually start at 1/125 second and move faster if children, dancers, or candid movement enter the frame. For interiors on a tripod, I am comfortable going much slower because the scene is not moving.
Open the aperture for people, close it for detail
A wide aperture such as f/1.8 to f/2.8 helps portraits and low-light candid shots because it admits more light and isolates the subject. For food, products, and room scenes, I often stop down to f/4, f/5.6, or even f/8 so more of the subject stays sharp. The right aperture depends on the style, not on a fixed rule.
Read Also: Conference Photography - Master Event Coverage That Works
Let ISO rise, but with intention
I would rather use a slightly higher ISO than accept blur from a slow shutter. On modern cameras, ISO 1600 to 6400 can be perfectly usable when the exposure is correct, though older bodies may look cleaner at lower values. The real mistake is underexposing indoors and then trying to rescue the image later, because that usually creates more noise than a straight ISO increase would have.
White balance is the camera’s color correction for warm or cool light, and indoors it is rarely optional. I leave it on Auto when the room is lit by one clean source, but I switch to a Kelvin preset or manual reading when daylight and artificial light are mixing. For people, I also use single-point or eye-detection autofocus so the camera lands on the eyes, not the nearest object.
| Subject | Useful starting point | Why it works |
|---|---|---|
| Window portraits | f/1.8-f/2.8, 1/125s, Auto ISO | Keeps the eyes sharp and lets the background fall away naturally. |
| Food or products | f/4-f/8, 1/60s or tripod, low ISO | Protects texture, labels, and edges that clients notice immediately. |
| Interiors and decor | f/5.6-f/8, tripod, ISO 100-400 | Helps lines stay crisp and gives more depth across the room. |
| Kids and events | f/1.8-f/2.8, 1/250s+, higher ISO | Freezes motion before expressions and gestures disappear. |
I also shoot RAW whenever possible. RAW files give me more room to correct white balance, exposure, and contrast, which matters a lot in rooms where the light is not behaving. That flexibility becomes especially useful once framing and composition enter the picture.
Compose for the room, not just the subject
A good indoor image feels intentional because the frame supports the subject instead of competing with it. I look for lines, edges, and background clutter before I think about exposure, because a strong composition can save a simple scene while a messy one can ruin an otherwise good file.
- Keep the background simple. A plain wall, curtain, bookshelf, or soft blur is usually better than a busy room full of small distractions.
- Straighten vertical lines in interiors. Tilting walls and door frames makes a room feel sloppy, especially in real estate, architecture, or brand content.
- Use the window or doorway as a frame. That adds depth and makes the photo feel less static.
- Watch the edges of the frame. Lamps, chair legs, and cut-off objects often pull attention away from the subject.
- Change your height. Eye level feels natural for portraits and lifestyle scenes; slightly higher angles often help with food, flat lays, and products.
For indoor work, I also prefer to leave a little more breathing room than I would outdoors. Rooms are dense with objects, so negative space gives the eye somewhere to rest. Once the frame is clean, the subject-specific choices become much clearer.
Match the method to the subject in front of you
Indoor photography is not one genre. A portrait, a plated dish, a product for an e-commerce page, and a small apartment each ask for a different balance of light, depth of field, and background control. When I treat them all the same, the images look generic; when I match the method to the subject, the whole frame gets better quickly.
| Subject style | What to prioritize | Practical approach |
|---|---|---|
| Portraits | Eyes, skin tone, and mood | Use window light at an angle, keep the background soft, and focus on the eye closest to the camera. |
| Food | Texture, color, and freshness | Shoot from the angle that shows the structure of the dish, and avoid overhead room lights that make food look flat. |
| Products | Shape, label clarity, and reflections | Use diffused side light, a tripod, and a smaller aperture so edges stay sharp and logos remain readable. |
| Interiors | Scale, straight lines, and depth | Keep the camera level, use a tripod if possible, and avoid over-correcting perspective to the point that the room looks artificial. |
| Candid family or event scenes | Timing and motion control | Use a faster shutter, stay ready before the moment happens, and accept that a clean, natural expression matters more than technical perfection. |
For portraits, I want the face to feel alive, not overprocessed. For products and interiors, I care more about control and consistency, because those images usually need to do a job: sell, explain, or document. That difference in purpose changes how I shoot the same room.
Fix the mistakes that quietly flatten indoor images
Most indoor failures are not dramatic. They are small decisions that stack up: a slow shutter, a mixed color cast, a busy background, or a flash pointed straight at the subject. I see those issues far more often than bad cameras or bad lenses.
- Shooting from the wrong light. If the subject is facing away from the best source, the image often looks dull before you even review it.
- Using the shutter too slowly. Blur is easy to miss on a rear screen and painful to discover later.
- Ignoring flicker. Some LEDs and fluorescent fixtures create uneven exposure or color shifts, especially when the shutter speed is awkward for the light source.
- Over-relying on direct flash. Harsh flash can be useful, but it often makes skin shiny and backgrounds fall into black shadows.
- Leaving the room cluttered. Indoor scenes usually improve when one or two distracting objects are removed from the edge of the frame.
- Trusting auto white balance too much. Auto can be fine, but mixed light often fools it, so I check the result rather than assuming it is right.
- Not using flicker reduction when the camera offers it. In LED-lit rooms, that setting can reduce frame-to-frame inconsistency and save time in post.
My practical fix is simple: I take one test frame, zoom in on the eyes or the key detail, and check both sharpness and color before I keep shooting. That one habit catches more problems than any preset or app ever will, and it leads naturally to a repeatable workflow.
The indoor workflow I use when I want repeatable results
When the room changes from one shoot to the next, I do not want to reinvent the process. My routine is to find the cleanest light first, place the subject where that light shapes it best, choose aperture and shutter speed based on movement, then lock white balance and fine-tune ISO only as needed. If the scene is static, I use a tripod and let the camera slow down; if the scene is active, I protect motion first and accept the higher ISO.
If I have to move quickly, I still follow the same order: light, subject placement, focus, exposure, then composition check. That sequence keeps me from chasing random settings and lets me adapt to the room instead of fighting it. The most useful habit is to treat every indoor frame as a set of tradeoffs, not a mystery, because once you do that, indoor shooting stops feeling unpredictable and starts feeling repeatable.
